Payroll Processing
Welcome to New World ERP Payroll Processing. This topic will guide you through the setup and processing aspects of Payroll Processing.
It is divided into two sections:
The System Administrator will focus on the set-up components necessary to utilize Payroll Processing within New World ERP. This will include detailed information on “master files” that must be set-up such as Pay Batches and Frequencies and will also include the security settings which will be utilized to enable workflow and tailor user options to your needs.
The End User will describe the steps, workflow and options available in Payroll Processing to the end-user. It will guide you through the process from payroll initialization through to posting of the payroll. Included in the section will be a guide to the standard reports available in the software.
Pay Batch Setup
Before starting the payroll, a batch must be set-up. While it is recommended that all of the batches are set-up in advance, batches can be created one at a time before the payroll process begins. A batch can be set up as a manual batch each time a payroll begins or as an Auto Build which will build batches for a full year.
Auto Build Pay Batch Setup
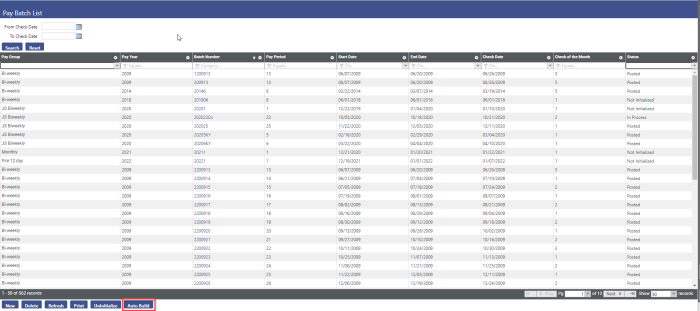
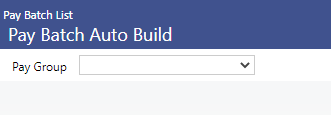
Maintenance > Human Resources > Pay Day Setup > Pay Batches. Then click on the Auto Build button.
Select the Pay Group for batches you want to pre-build.
This action will display six controls requiring entries. Values will change depending on the type of pay group selected. Displayed below is the setup for a bi-weekly payroll.
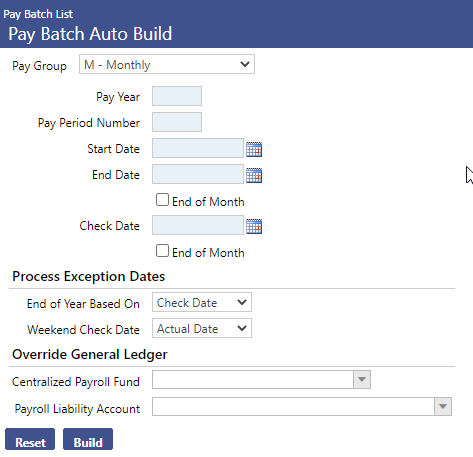
Type the Pay Year.
Type the Pay Period Number (typically this number would be a 1 so it can count the 26 pay periods in the year).
In the End of Year Based on field, select whether the end of the year will be based on the actual Check Date, the pay period Start Date or the pay period End Date.
In the Start Date field, select the first day of the first pay period of the year.
In the End Date field, select the last day of the first pay period of the year.
In the Check Date field, select the date that the first check will be paid to employees.
Note: Start Date and End Date entries establish the pay period interval and will be used to calculate the start and end dates of all pay batches for the year. Even if the first pay period is shortened or changed due to the holiday, enter what the range should be as to not affect the calculation of future batches. Changes are allowed to be made to the dates after batch creation is complete.
If the payroll is going to be paid out of a separate General Ledger than what has been set up in Company HR Settings, populate this information under the Override General Ledger section. This allows for the simultaneous processing of payrolls that use different fund and liability accounts.
Click the Build button.
When the build is complete, a pop-up will open to ask whether the user wants to build another set of pay batches.
If the user wants to build more pay batches for the next pay year, click OK. The fields on the Pay Batch Auto Build page will be cleared for new entries.
Otherwise, click Cancel. The user will be taken back to the Pay Batch List screen to review what has been entered and enter changes to the dates if needed by clicking on the pay batch number.
Manual Pay Batch Setup
If a special batch needs to be completed outside of the batches previously set up, or if it is the organization’s policy to create the batches one at a time prior to the initialization of payroll, a manual batch can be set up.
Maintenance > Human Resources > Pay Day Setup > Pay Batches. Then click on the New button.
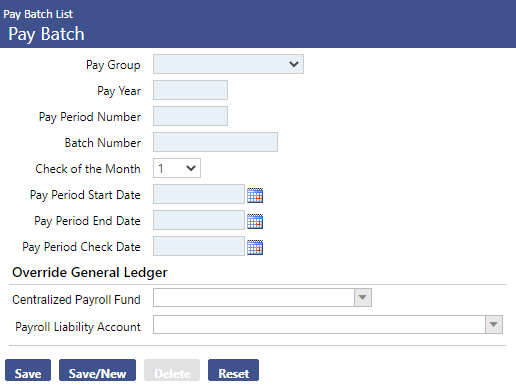
Select the Pay Group of the batch you want to build. (Click in the field to select from a list of available pay groups.)
Type the Pay Year.
Type a Pay Period Number (If this batch is outside of the normal pay batches for the year, you may want to number it something other than 1-26. Batch values may be alphanumeric.)
Select the Check of the Month to which this pay batch is tied. The available entries are 1 through 5. The number you enter here affects which deductions/benefits are included in the employees’ checks.
In the Pay Period Start Date field, select the first day of the pay period.
In the Pay Period End Date field, select the last day of the pay period.
In the Pay Period Check Date field, select the date that the check will be paid to employees.
If the payroll is going to be paid out of a separate General Ledger than what has been set up in Company HR Settings, populate this information under the Override General Ledger section.
After completing your entries, click Save. The pay batch will be added to the grid on the Pay Batch List page.
User-Based Security
The User-Based Security Settings area contains permissions per user that will control the ability for Payroll users to override settings during Payroll Processing.
General Function
Maintenance>new world ERP Suite >Security >User Based Security >General Function
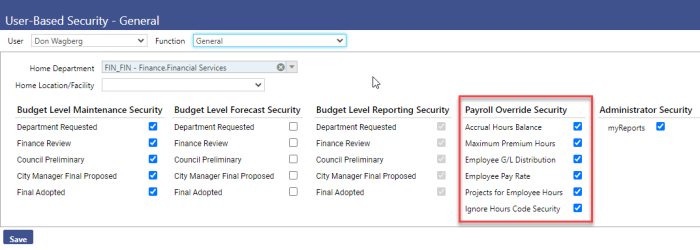
The Payroll Override Security section concentrates on the possible overrides a user can have during the payroll process.
Accrual Hours Balance – This permission gives the user the ability to grant any given employee the capability to use more time than they currently have in their accrual bank. A warning will appear on the employee’s timesheet that the user will be able to accept, thus giving the employee have a negative balance on their accrual banks
Maximum Premium Hours – If a maximum number of premium hours has been utilized in employee Benefit Groups, this permission will allow the user to override the maximum balance that has been specified.
Employee G/L Distribution – This permission allows the user to override an employee’s default G/L account specified in their Workforce Administration Jobs tab. The specific accounts the user can override to is defined in a later section of this manual. This permission is useful if a certain hour’s code is charged to an account that is different from the employee’s usual account, and/or an employee has been loaned to another department and their hours need to be charged to this secondary department.
Employee Pay Rate – This permission will allow the user to override the employee’s default pay rate to another rate of pay during hours entry.
Projects for Employee Hours– If Projects are being used to track employees’ time, this permission will allow the user to associate varying project codes to employees’ entered time.
Ignore Hours Code Security – This permission allows the user to override any settings associated with hours codes.
Hours Codes Function
Maintenance>new world ERP Suite>Security>User Based Security>Hours Codes

All hours codes that have previously been set up in the system are listed on this screen. On a user basis, the hours codes will need to be distributed among the three available columns: Available, View, Use.
Available – Hours Codes listed in this column are not available for the user to view and/or use during hours entry. When hours codes are first created, they will appear under this column automatically.
View – Hours Codes listed in this column are available for the user to see during the time entry process, but they will appear in a read-only state. The user will be able to delete the line item that includes these hours codes, but changes will not be allowed. Moreover, these hours codes will not appear in the drop-down menu for the user to select during time entry.
Use – Hours Codes listed in this section are available for the user to select, modify, and/or delete during time entry. Additionally, the user will be able to make changes to line items including these hours codes if they are automatically added to the employee’s time sheet due to the employee’s schedule.
Sub Ledgers Function
The Sub Ledger area of User Based Security allows for filtering of the General Ledger Organization Sets that a user can work with in the Payroll Processing Module. This can be utilized to provide administrators access to all organization sets while limiting departmental users to their own areas.
Maintenance>new world ERP Suite>Security>User Based Security>Sub Ledgers
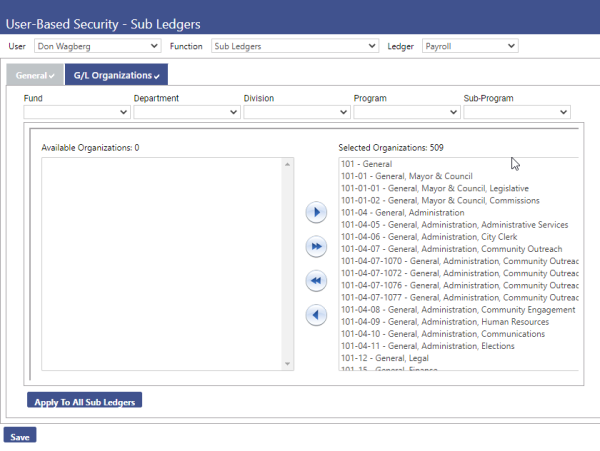
After accessing the Sub Ledger area, click the Ledger drop-down and select Payroll. Then select the GL Organizations tab below.
Listed in the Available Organizations will be all GL Organization Sets. Select those organization sets for which the user should have access and move them to the Selected Organizations box on the right using the arrow buttons. When complete, click the Save button.
Pay Batch Initialization
Navigate to Human Resources > Payroll Manager
Note: Initializing a batch needs to be done to allow departmental users to enter time in new world ERP.
Located on the left side of the page, the Pay Batch Summary section lists all unposted pay batches currently in the system.
Every payroll has its own Pay Group and Batch Number, so multiple pay batches may be in progress at the same time. However, only one batch can be in processing at one time.
To see a quick snapshot of the status of the batch, the start date and end date of the batch, as well as the check date of a pay batch, hover the pointer over the Batch Number.
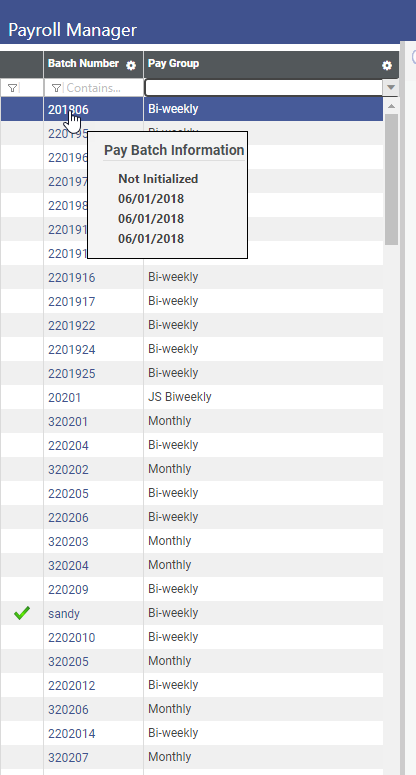
To initialize the desired batch, click the Batch Number you want. The Initialize Batch page will open.
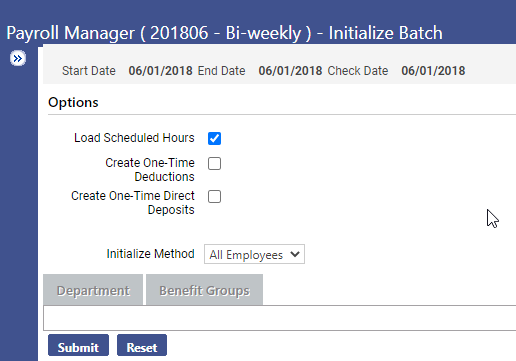
Load Scheduled Hours is selected by default. Selecting this box will import hours information from employees' schedules in Workforce Administration. Holiday pay hours set up for any benefit groups in Maintenance also will be imported.
Once these hours are imported, you may adjust them on an exception basis.
Create One Time Deductions will import deductions that could not be processed in previous payroll cycles. A listing of all deductions that would be imported is found on the Deductions Not Taken section in Post Payroll Processing.
If you do not select the Create One-Time Deductions box, unpaid deductions will remain until this box is selected. However, the amount may be loaded later in the process through one-time processing.
Create One Time Direct Deposits will import any direct deposits that could not be processed in previous payroll cycles. A listing of all direct deposits that would be imported is found on the Direct Deposit Not Taken section in Post Payroll Processing.
If you leave this box cleared, the amount may be loaded through one-time processing for each employee.
Click the Submit button.
A Payroll Initialization Audit Report will be generated detailing the errors (if any) that exist. If there are no errors, close the report to begin the payroll process.
If errors exist, the report will detail the error descriptions. Errors must be fixed before a payroll can proceed.
Common error messages refer to employees without general ledger accounts, positions or primary departments.
Un-Initialize Payroll
Un-initializing a payroll will clear out all entries made in the Payroll Processing batch. As all entries in the batch will be erased, this should only be done if absolutely necessary. Un-initialization can be done up until the payroll has entered the processing phase (e.g. checks are in the process of being printed). The user can delete the processing batch if payroll needs to be uninitialized after this point. Once a payroll batch has been posted, the batch is no longer available in Payroll Processing Batch List and is no longer eligible for un-initialization.
Note: The system cannot undo the Un-Initialization process. Un-initializing the budget will require starting the payroll over for the desired batch.
Maintenance >Human Resources> Pay Day Setup > Pay Batches.
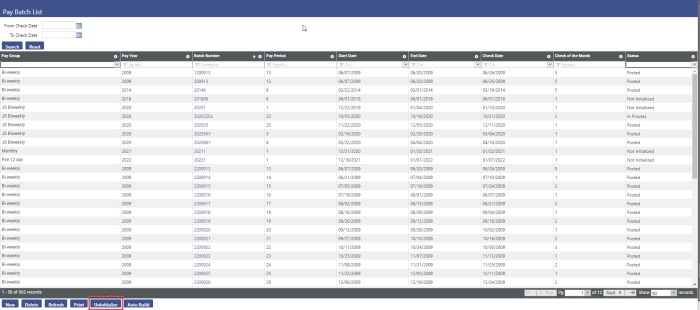
To un-initialize a payroll batch, go to the Pay Batches section under maintenance.
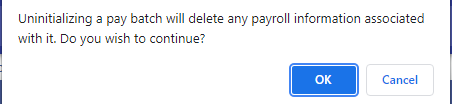
Choose the pay batch that needs to be uninitialized and then click the Un-Initialize button. The system will produce a message to confirm the uninitialize process. Clicking the OK button will complete the process.
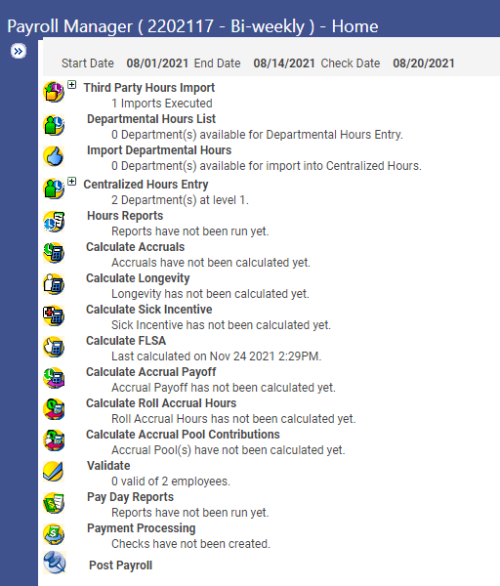
Payroll Processing Payroll Manager
The Payroll Manager lets the user review and perform all payroll processing steps, from initialization to posting, from a centralized location in the software. While payroll can be completed from individual menu items, this guide will focus on doing all tasks from this screen and show the status under each header.
Four areas must be completed to post the payroll: Hours Entry, Validate, Payment Processing, and Post Payroll.
All other areas may be completed each payroll cycle, but the system will let you continue with the process without warning if these areas are not processed.
Payroll Processing
Third Party Hours Import
If your organization has an outside timekeeping program that tracks employees’ work hours, they will be imported into the payroll using this feature. The import file must be in a .csv format or created from the eTimesheets module of new world ERP.
To recognize position numbers that have been overridden, Override Position Number is on the Third-Party Hours Import file.
Override Job also has been renamed as Override Job Title. On the Third-Party Import Edit Listing, the Job column has been renamed as Override Job\Position Number.
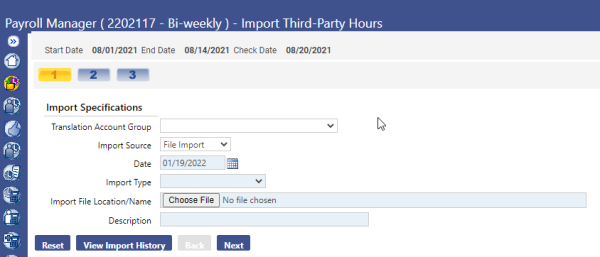
Under the Import Specifications field, fill in the following:
Import Type - There will be an option in the drop-down menu for Payroll Hours.
Date - This will default to the current date. It can be changed accordingly if it needs to reflect an alternate date.
Import File Locations/Name - Use the Browse button to search for the file and select it for automatic entry.
Description - Type a description for the file. This name will be reflected in the View Import History should the user wish to go back and verify which imports had been completed.
Click the Next button. The following screen will display any errors with the import. If there are errors, go back to the file and modify the information prior to attempting to re-import.
To import the third-party hours, click the Import Hours button. Hours records that cannot be imported will be printed on an error listing and sent to myReports.
Departmental Hours List
If your organization has a decentralized method of time entry, (e.g. representatives from each department entering and editing time for their employees) this screen is where departments would enter and approve their time. Not all departments must be decentralized to use the decentralized payroll method.
The Departmental Hours List page contains a grid of departments that are in the Departmental Hours Entry process for the selected batch. The grid is sorted alphabetically by Department Code and Description.
Departmental users will have access only to the departments for which they are authorized to enter time. To access time sheets for employees, click the plus sign next to the department name to view a listing of all employees currently assigned to the specified department. Click on the employee’s name to access their time sheet information.
Once all time has been entered and verified, a department may employ up to six levels of approval. Set up decentralized departments and levels of approval in Process Manager.
Note: Departmental Hours entry can be skipped if one department is responsible for entering hours for all employees in the organization.
A detailed description of hours entry will be discussed in the Hours Entry section on page 21.
Import Departmental Hours
The Import Departmental Hours page lets the user view whether departments have completed the approval process, approve those hours if they have not, and import them to the centralized payroll process.
Before the user is able to import departmental hours to Centralized Hours Entry, all departmental hours must be approved. A green check mark in the Approved column indicates the department’s time entry has been fully approved and is ready for import.
To approve departments that have not been previously verified, select the boxes next to the department. To approve all departments at once, select the box at the top of the Approved column. Click the Approve Selected button to approve the hours for import to Centralized Hours Entry.
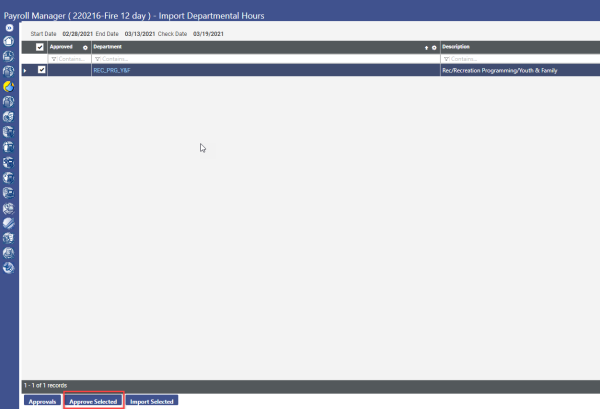
To import hours to Centralized Hours Entry, select the box corresponding with each department whose hours are to be imported. To import all department hours, select the box at the top next to the Approved column. Then click the Import Selected button.
Departments will be moved from the Departmental Hours List page to the Employee Hours (Centralized Hours) Entry page.
Once all departments have been moved to Employee Hours Entry, the Approvals, Approve Selected and Import Selected buttons will be disabled.
Note: After departments have been imported into Centralized Hours Entry, departments can no longer make edits to their time.
Centralized Hours Entry
The Centralized Hours List lets the user search for employees who are in the payroll batch after the employee hours have been imported from departmental hours. From this page, the user may edit the hours and/or add employees to the pay batch.
Use the fields at the top of the page to narrow your search for employee hours records.
Leaving all fields blank will find all employee hours records.
Selecting the Not Validated Only box will find only the employee hours records that have not been previously validated through the payroll validation process.
The Hours Entry Mode determines whether hours information for an employee will display in Quick Entry or Detail Entry mode when you click an Employee hyperlink on this page.
Click the Search button. The pay batch will be searched for information matching the search criteria entered. Any field left blank will return all information for that field.
Results of the search will display on the bottom half of the page, sorted alphabetically by employee name.
To provide the same hours totals that are displayed in Employee Hours Entry, Premium and Regular + Premium columns are in the Centralized Hours List grid.
Hours Entry
To begin the hours entry process, click on an employee’s name after performing a search using the criteria described above.
The time entry screen will be auto populated with any employees’ regular scheduled hours and regular additional pay (Cell phone etc.). There are two ways to enter time into the system; Quick Entry and Hours Code Entry.
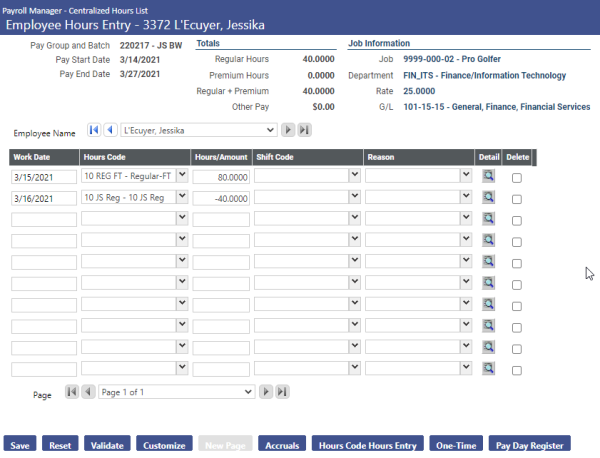
Quick Entry - This method works by adding hours on a line by line basis. If an employee’s time is split between two or more hours codes in one day, this will need to be multiple lines.
If adjustments need to be made the user can adjust the hours or select a different hours code by clicking the down arrow and then select the appropriate code.
Note: Before adjusting accrual hours the user may want to click on the “Accruals” icon to ensure the employee has enough accrued time before using the requested codes.
A warning message will appear to let the user know if the employee does not have an available balance of the number of hours entered once the time sheet is saved. Unless granted override security, the user will have to choose another hours code prior to continuing to the next employee.
If hours need to be deleted on the timesheet, click on the Delete check box at the end of the line to be deleted and left click the Save button.
To enter an additional line of hours, click in the Work Date field of the first blank line. (You may need to go the second page.) The date will auto populate with the next date in sequence when the user clicks in the date box; however, this date can be edited with the appropriate date.
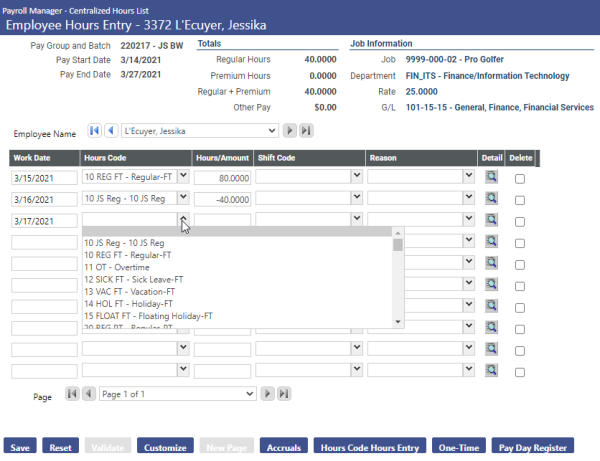
Click on the down arrow in the Hours Code column and select the hours code for the time to be entered. Type in the number of hours in the Hours/Amount column.
To continue to the next employee, click on the single arrow located at the right of the Employee’s name. The double arrow will go the bottom of the list.
The user does not have to save after every employee; once all time has been entered for the employees click on the Save button to save all employees’ time entered.
Hours Code Hours Entry – This method works as a pay grid. Hours codes are defined in the columns across the top of the screen. This method works best when employees use multiple hours codes on the same day or work multiple shifts within a pay period.
The hours codes along the top of the grid can be defined in Company HR Settings as the defaults to be used across all users. Users can add additional needed hours codes to any columns that do not have an hours codes already pre-defined at time of entry.
Enter the work date, select the shift (if necessary), and enter the number of hours in the appropriate column(s). If the hours code is an “Other Amount” (salary), enter the dollar amount paid.
The user must click the Save button at the bottom of the screen to save the information entered prior to clicking the arrow to move to the next employee in the department.
Adding an Employee to the Batch
If an employee was created in the since after the payroll was initialized, the employee will need to be added to the payroll batch. Click the New button to open the Add Employee to Batch pop-up.
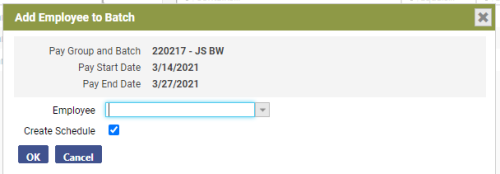
Using the drop-down, select an Employee.
Create Schedule – Select this box for the employee's scheduled hours to be created at the time the employee is added to the batch.
Click OK. The pop-up will close, and the Centralized Hours List page will reopen with the new employee highlighted.
Deleting an Employee from the Batch
To delete an employee from the pay batch, use the Delete Selected button on the Employee Hours page. The most common reason to delete employees from a batch would be if the employee had no hours worked in the pay period; whether they are part-time or on-call.
Left Click on the Search button to show all of the imported employees
To delete an employee, click on the box in front of the employee’s name and then click on the Delete Selected button.
A warning message will pop up to let alerting the user that all assigned hours will be deleted. If appropriate, click the OK button.
Note: Once an employee has been deleted there is no way to recover the information. The employee can be added back into the payroll, but all of the hours and calculation (in any) information associated that individual will have to be re-entered.
One-Time Processing
The One Time button in Centralized Hours Entry gives the option to process an employee benefit, deduction or direct deposit change that will affect one check only and not modify the employee Workforce Administration file.
Before using this feature, the benefit, deduction or direct deposit being modified will have to be set up and active on the employee's record in Workforce Administration.
Search for the desired employee in Centralized Hours Entry.
With the employee highlighted, click the One-Time button at the bottom of the screen. Once the One Time Processing List screen opens, click the New button.
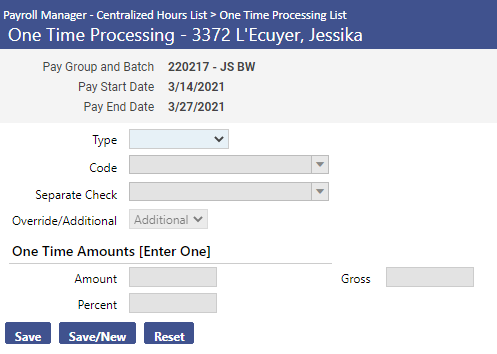
When setting up a new one-time deduction, the user will select the type of one time process to create. The options are benefit, deduction, and direct-deposit.
Once the user has selected the appropriate type, select the code to use in the line below. If necessary, select a Separate Check code to use for this process.
Override – Selecting this option will override the current amount of the deduction, benefit, or direct deposit and replace it with the amount entered in the fields below.
Additional – Selecting this option will increase or decrease the current amount on the employee record by the amount entered in the fields below.
Enter the appropriate correction amount in either the Amount or Percent fields. To modify the gross base the system uses to calculate a percentage benefit and/or deduction, enter the desired amount in the Gross field. Click Save to exit the process, or Save/New to enter another entry.
Hours Reports
The Hours Reports page lets the user print a variety of pay day reports to verify hours entries before processing the payroll.
Hours Entry Worksheet – This is a worksheet-based report that allows the user to print an hours entry sheet for departments to enter time for their employees for the upcoming payroll.
Payroll Hours Register – This report allows the user to print an hours register for the specified pay batch. The user would use this report to verify hours entered for each department and/or employee as it shows the hours entered and detailed payment information for each employee.
Hours Exception Report – This report allows the user to print a report that lists employees whose hours entered were outside normal hours criteria specified on the Jobs tab of the employee’s Workforce Administration file. An example of exceptions would be an employee that had no time entered in the batch, or had too much time entered for them. Exceptions listed on this report will not stop the payroll from running as these are warnings for the user to check prior to proceeding.
To print a report, click on the name of the report and enter the required criteria.
Calculate Accruals
Use this page to run accrual calculations for benefit hour amounts that have accrued for selected profiles and apply the amounts to each qualified employee's accrual bank.
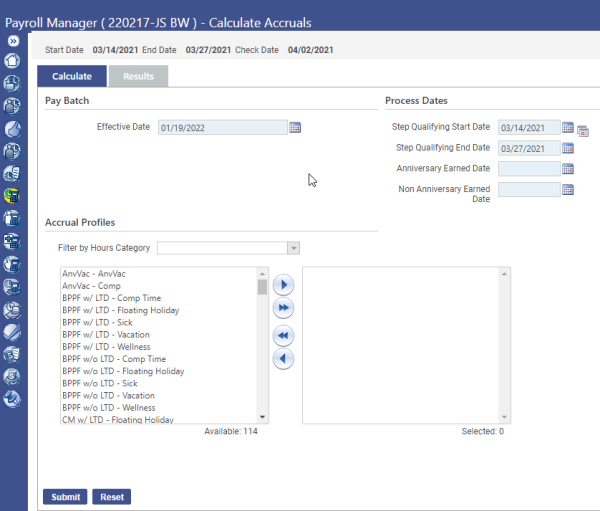
There are two tabs on the Calculate Accrual screen; a Calculate tab and a Results tab. The Calculate tab allows the user to select the pay batch the accrual hours are to be uploaded to, the process date used to calculate the correct accrual amounts and accrual profiles to be included in the accrual. Calculate the correct accrual amounts and accrual profiles to be included in the accrual.
Effective Date – The date entered in the field will limit the selection of accrual plans and associated profiles to those that are currently active and validated. Today's date is defaulted in this field, but it can be changed accordingly. The recommended date is the last day of the pay period.
Step Qualifying Start Date and Step Qualifying End Date – The start and end dates that are used to determine what step of a plan will be used when the accrual calculation is run. The calculation will use this selection to determine the number of months each employee has worked and the accrual amount earned. For anniversary type accruals, all employees who have anniversaries within this time frame will have accruals calculated.
Anniversary Earned Dateand Non-Anniversary Earned Date - Select the dates to be used as the earned dates for anniversary and non-anniversary-based accrual calculations. These fields make it possible to run anniversary and non-anniversary accrual calculations at the same time. If an earned date has been specified in the Accrual Profile set-up, a date is not required in this field.
Click in the Filter by Hours Category field to select the type of accrual the user wishes to calculate. The selection made will filter the list of accrual plan profiles available for selection in the left (Available) multi-select list box, located below the Filter by Hours Category field. The list will be sorted alphabetically and will include only active, valid accrual plan profiles associated with the batch selected.
Select at least one plan profile using the jump arrows on the screen.
Click Submit to run accrual calculations. This process will take a few minutes to complete. Do not leave the screen until the calculation is complete.
After clicking the Submit button, the user will receive a warning that says calculating accruals will invalidate the payroll. This error is normal even if the user has not previously validated. Click Accept to allow the Accruals to calculate.
Note: Only employees whose employment statuses in Event Maintenance allow accruals will be included in this calculation.
To view the results of the calculation, click the Results tab.
The grid on this tab contains the results of the last accrual calculations submitted from the Calculate tab. Each row corresponds to a calculation, showing the name of the user who submitted the calculation, the date of the calculation, effective date, earned date, qualifying date range and accrual profile. Rows are sorted by User Name, followed by Calculated Date and Accrual Profile.
If the user needs to delete the hours created by the Accrual calculation, select the appropriate row by selecting the box next to the appropriate line, and click the Delete button. The user can then make corrections before re-running the calculation.
To generate and display a Calculate Accrual Register Report showing what was calculated for a selected profile and hours category combination, select the appropriate row(s), and click the Print button.
Calculate Longevity
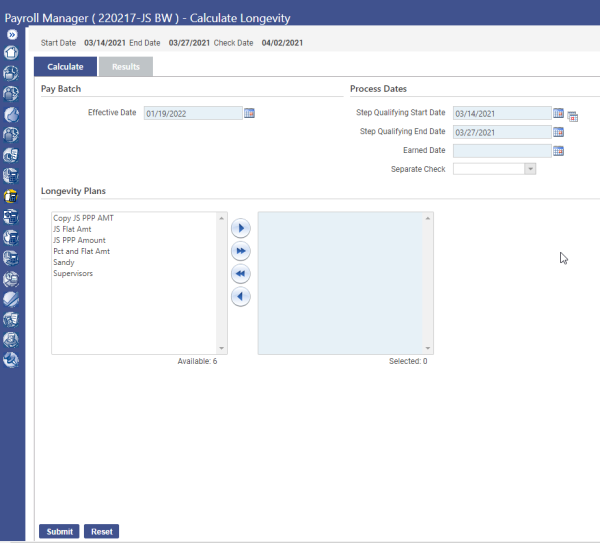
The Calculate Longevity page lets the user calculate the longevity pay amounts for qualifying employees, based on their length of time employed. This amount may be a flat amount or a percentage of the employees' base pay.
Note: If Longevity is calculated as an additional amount to an employee’s hourly rate, this calculation is not needed. Only run this calculation if the employee receives a lump sum payment per pay period or a pre-determined pay period per year.
Effective Date – The date entered in the field will limit the selection of longevity plans and associated profiles to those that are currently active and validated. Today's date is defaulted in this field, but it can be changed accordingly. The recommended date is the last day of the pay period.
Step Qualifying Start Date and Step Qualifying End Date – The start and end dates that are used to determine what step of a plan will be used when the longevity calculation is run. The calculation will use this selection to determine the number of months each employee has worked and the longevity amount earned. For anniversary type longevity payments, all employees who have anniversaries within this time frame will have longevity calculated.
Earned Date - Select the date to be used as the earned date for all longevity calculations. Longevity earnings will be assigned through this date.
If longevity will be paid separately from a regular pay batch process, select the Separate Check code to be used.
In the Longevity Plans section of the page, use the multi-select list boxes to select the longevity plans that will be included in the longevity earnings calculation. Only employees associated with the selected plans will have their longevity earnings calculated. Select at least one plan.
Click Submit to run longevity calculations. To view the results of the calculation, click the Results tab.
The grid on this tab contains the results of the last longevity calculations submitted from the Calculate tab. Each row corresponds to a calculation, showing separate check data, plans, the number of employees per plan, the name of the user who submitted the calculation, the date of the calculation, effective date and process dates. Rows are sorted by User Name, followed by Calculated Date.
If the user needs to delete the amounts created by the Longevity calculation, select the appropriate row by checking the box next to the appropriate line, and click the Delete button. The user can then make corrections before re-running the calculation.
To generate and display a Calculate Longevity Register Report showing what was calculated for a selected profile, select the appropriate row(s), and click the Print button.
Calculate Sick Incentive
The Calculate Sick Incentive page lets the user calculate the sick incentive pay amounts and/or time for qualifying employees who did not take the entire allotted threshold of sick time.
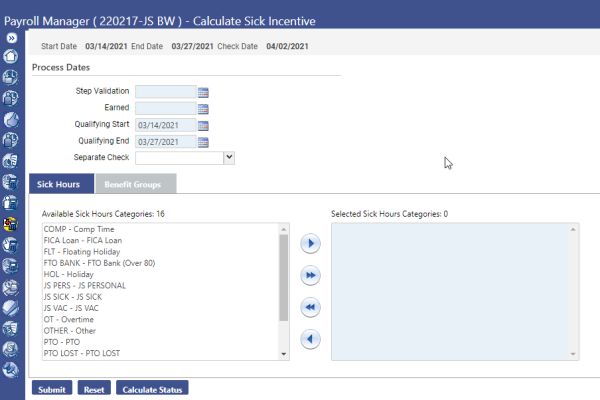
Step Validation - Compared with an employee's sick incentive start date to determine the months of longevity service, this date must fall between the Qualifying Start and Qualifying End dates of the batch selected.
Earned - This date must fall between the Qualifying Start and Qualifying End dates of the batch selected. Sick incentive earnings or hour accruals will be assigned to this date.
Qualifying Start and Qualifying End - For employees that must work a minimum number of hours to qualify for sick incentive, select the start and end dates of the comparison period.
If sick incentive calculations will be paid on a separate check from the main payroll, select the applicable Separate Check code from the drop-down list.
From the Available Sick Hours Categories multi-select list box, select at least one sick hours category. From the Available Benefit Groups multi-select list box, select at least one benefit group.
Click the Submit button to calculate the sick incentive amounts. When the calculation has completed, a message box will open. Click OK to clear the message.
Click the Calculate Status button. The Sick Incentive Calculations page will open, showing how sick incentive calculations were run for the pay batch. To print the Sick Incentive Register Report, select the applicable rows and click Print.
Calculate FLSA
The Fair Labor Standards Act (FLSA) mandates that employees who accumulate more than a specified number of hours worked during a given week or pay period must be compensated for the overtime hours at one and one-half times their regular rate. This law is meant to compensate employees who work uncommon hours and shifts.
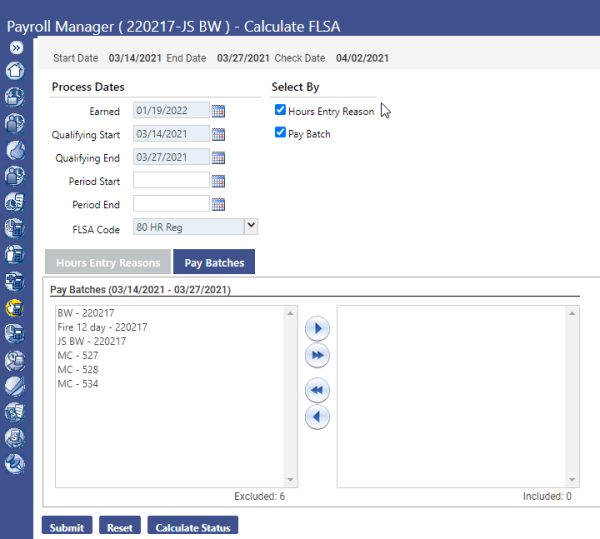
Based on codes set up in Maintenance, the Calculate FLSA page lets you calculate the FLSA pay amounts for qualifying employees.
Earned - Select the date the FLSA earnings will be applied. This date must fall between the Qualifying Start and Qualifying End dates of the batch selected.
Qualifying Start and Qualifying End – These dates limit the FLSA earnings calculation to a particular range of work dates. If the user is running the FLSA calculation for a five day FLSA period, this calculation will need to run twice in a pay period.
Select the FLSA Code that will be used to reflect the FLSA pay calculations on the employee timesheet.
Note: If the user would prefer to enter a specific rate to be paid for FLSA instead of the calculated rate, the Payroll section of the Workforce Administration Jobs tab contains an FLSA Rate field for overriding the pay amount.
The Hours Entry Reason and Pay Batch check boxes under the Select by header open multi-select list boxes containing hours entry reasons and pay batches that may be included separately in the FLSA calculation; for example, if the pay period qualifying start date were noon on Friday and the qualifying end date were 11:59 p.m. two Fridays later, one hours entry reason may pertain to week 1, covering a.m. hours, and the other may pertain to week 2, covering p.m. hours. These selections and the qualifying date range will enable the FLSA calculation to be separated accordingly.
Click the Submit button to calculate the required FLSA payment.
Click the Calculate Status button. The FLSA Calculations pop-up will open, showing how FLSA calculations were run for a particular pay batch.
To run the FLSA Register Report, select the rows to be included and click Print to generate and display the report.
Calculate Accrual Payoff
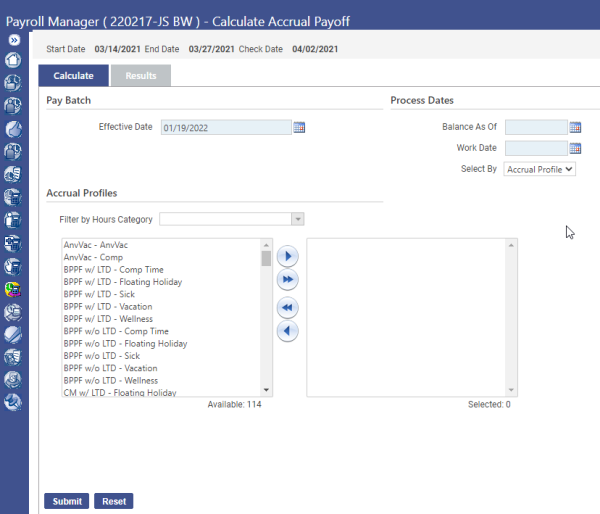
The Calculate Accrual Payoff page lets the user make payments to employees for accrued benefit time. Use this function if an employee terminates employment or a contract requires remaining benefit time to be paid off periodically.
Effective Date - The date entered in the field will limit the selection of accrual plans and associated profiles to those that are currently active and validated. Today's date is defaulted in this field, but it can be changed accordingly. The recommended date is the last day of the pay period.
Balance AsOf - Date used to determine the balance that will be paid. The system will compare the date entered to the Accrual balance on that date. The default entry is the last day of pay period.
WorkDate - Date the balance will be paid on the employee(s)’ timesheet. The default entry is the last day of pay period. This date must fall within the current pay period.
Select By - Determine whether the payoff will be made for a particular employee or accrual profile. The default selection is Accrual Profile. If the Employee value is selected, choose the Employee for whom the payoff will be made.
The bottom-half of the tab contains a Filter by Hours Category field for the selection of the accrual type hours category and multi-select list boxes for the selection of the accrual profiles that will be used in an accrual payoff calculation. Click in the Filter by Hours Category field to select from a list of valid hours categories. Your selection will filter the list of accrual profiles available for selection in the left multi-select list box. The user must select at least one profile.
Click the Submit button to run accrual payoff calculations for employees in the criteria selected. To view the results of the calculation, click the Results tab.
The grid on the Results tab contains the results of the last accrual payoff calculations submitted from the Calculate tab. Each row corresponds to a calculation, showing the name of the user who submitted the calculation, the date of the calculation, effective date, earned date, qualifying date range and accrual profile. Rows are sorted by User Name, followed by Calculated Date and Accrual Profile.
If a calculation contains errors, select the appropriate row, click the Delete button, and make corrections in the accrual profile setup and /or the employee Employment dates.
To generate and display an Accrual Payoff Register showing what was calculated for a selected profile and hours category combination, select the appropriate row(s), and click the Print button.
Roll Accrual Hours
Use this page to calculate the year-end or periodic accrual hour adjustments for Employees. Using the date ranges entered, the calculation carries to the next year (or pay period) not more than the amount defined as a cap. The excess hours may do the following: be lost (reduces the accrual bank with no financial gain to the employee), be paid out to the employee while reducing the accrual bank, or it may be distributed among one or two other accrual categories. The action the system will take is defined during the set-up of the Accrual Profiles.
Posted and unposted records are used in determining each employee's accrual balance for each profile.
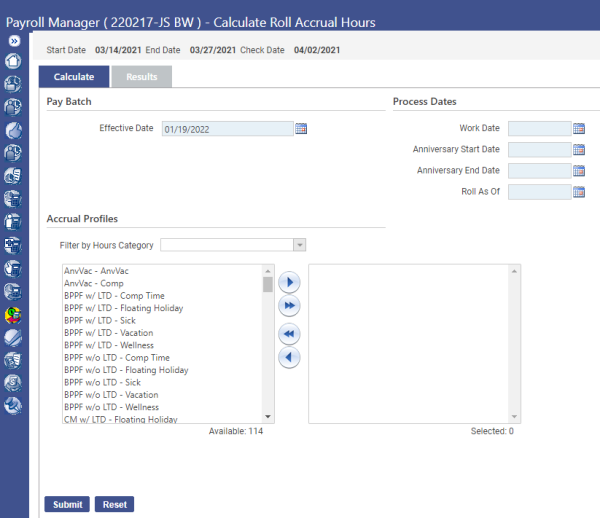
Effective Date - The date entered in the field will limit the selection of accrual plans and associated profiles to those that are currently active and validated. Today's date is defaulted in this field, but it can be changed accordingly. The recommended date is the last day of the pay period.
Work Date - Date the balance to be rolled will be reflected on the employee(s)’ timesheet.
Anniversary Start and End Date – Dates that the system will look at to determine which employees’ balances to calculate. If the user wishes to include all employees in this calculation, enter the first and last day of the year.
Roll As Of – Date that identifies the last date in the period to use the specified accrual bank.
Click in the Filter by Hours Category field to select from a drop-down list of valid accrual categories. Select at least one plan profile and click the right-arrow button to move the selections to the right box. Click the Submit button to run the calculations. To view the results of the calculation, click the Results tab.
The grid on this tab contains the results of the last roll accrual calculations submitted from the Calculate tab. Each row corresponds to a calculation, showing the name of the user who submitted the calculation, the date of the calculation, effective date, earned date, qualifying date range and accrual profile. Rows are sorted by User Name, followed by Calculated Date and Accrual Profile.
If a calculation contains errors, select the appropriate row, click the Delete button, and make corrections in the accrual profile setup and /or the employee timesheet.
To generate and display a Roll Accrual Register showing what was calculated for a selected profile and hours category combination, select the appropriate row(s), and click the Print button.
Calculate Accrual Pool Contributions
Accrual Pools is an accrual bank for donated hours, usually sick, to be used by another employee at a later date as needed after that employee has depleted their bank of the specified hours. This calculation determines the amount of time that each employee will donate if they are required to give a specified amount of time to the pool per calculation period.
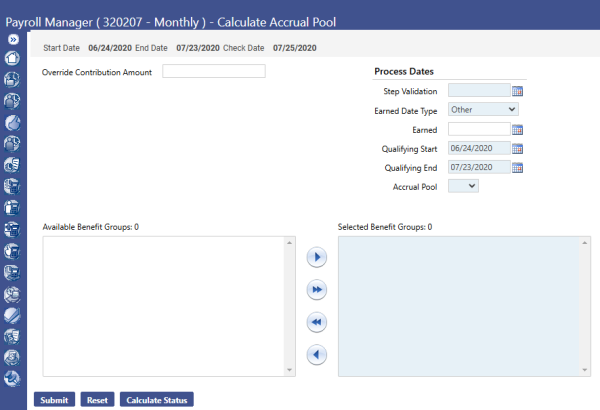
Override Contribution Amount - If a number is placed in this field, the system will replace the calculated amount of time with the number entered in this field.
Step Validation - This is the date that the system use to determine what number of hours will be donated to the Accrual Pool.
Earned - The work date to which accrual earnings will be assigned. This date must occur between the start and end dates of the batch selected.
Qualifying Start/End - The dates that the system uses to determine the number of hours worked during that time frame. The number of hours worked will affect the amount of time donated.
Accrual Pool - The accrual category where the hours donated are going. This category is usually identified as Donated.
Add the Benefit Groups that are to be calculated and click the Submit button at the bottom of the screen for the system to run the calculation.
The Calculate Status button opens the Accrual Calculations page, where a grid shows how accrual calculations were run for the selected pay batch.
If a calculation contains errors, select the appropriate row, click the Delete button, and make corrections in the Benefit Group set-up.
To generate and display a register showing what was calculated for a selected profile and hours category combination, select the appropriate row(s), and click the Print button.
Validate
Once payroll has reviewed and edited all hours and all one-time processing has been completed, the pay batch should be validated (calculated).
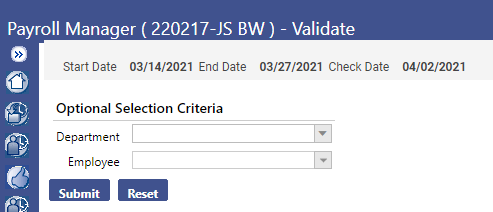
The validation process ensures all general ledger accounts expensed during payroll are set up and valid. It also ensures employees do not have zero hours, garnishments equal deduction amounts, effective date ranges are valid and more.
Department – Use this field to validate hours for a single department
Employee – Use this field to validate hours for a particular employee and not the entire batch. If you have already validated the payroll, but made a change to a person’s hours or setup, you can validate the employee individually by filling in the employee name in this section. This will shorten the time it takes for the payroll calculation.
To validate all employees in the batch, leave both fields blank and click the Submit button. A Payroll Validation Calculation Results report will be generated and sent to myReports. The report may take a few minutes to complete.
Two reports can be generated:
Payroll Validation Report – This report will show a summary of the employee earnings. It also lists any employees that were not able to validate and why.
Payroll Validation Setup and Error Report – This report will show only the validation errors and will only appear if there are errors.
Note: To complete the Payroll Process, all employees must be validated.
To fix employee validation errors, go back to Centralized Hours Entry.
To make corrections to hours records that were not validated, select the Not Validated Only check box in the search options.
Click the Search button to populate the grid with non-validated employees only. Click on the red “X” populated by the employee’s name to get the specific error for that employee. Corrections will have to be made to either the employee timesheet or other areas of the system to fix the error.
The user will need to Validate again after all records are reviewed and errors are cleared.
Pay Day Reports
The Pay Day Reports page lets the user select the pay day reports to be printed for a particular pay batch.
All of the final reports that are run during payroll processing are listed here. Only validated employees will show up on these reports.
All of these reports will be available in history after the payroll is posted. Therefore, it is not necessary for the user to print all these reports each pay period.
Pay Day Register – Allows the user to view all calculations for the employees and view what the check will reflect. The employee’s detailed pay information, taxes, benefits, and deductions are shown. Moreover, the amount of money going to the employee’s direct deposit is shown. At the end of the report, it gives a summary page of totals for all hours codes, deductions, taxes, benefits, and banks for all employees.
Earnings Register - Allows the user to view a summarized report of the gross pay, taxes and deductions for each check created for the selected pay batch. Similar to the Pay Day Register, just in a condensed version.
Benefit Register - Allows the user to view a report of selected benefits and associated payments for all employees in the batch. Also allows the report to be ran including the Social Security numbers and/or Life-to-Date/Year-to-Date numbers.
Deduction Register - Same as the Benefit Register concerning employee deductions
Cafeteria Plan Register - Allows the user to view a report regarding employee’s benefits/deductions that are taking part in the organization’s cafeteria plan. The Cafeteria Plan module must be purchased and operational for this report to function.
Tax Register - Allows the user to view a report that gives specific tax information for all employees/departments included in the pay batch.
Worker’s Comp Register - Allows the user to view a report that lists totals of Worker’s Comp payments for employees/departments.
Journal Register - Allows the user to view a report listing the General Ledger entries based on specified criteria for the pay batch.
Project Journal Register - Allows the user to view a report on a specific payroll all the related expenses broken down by the projects the payroll activity is associated with. It is intended for use by project managers to analyze payroll-related expenses for the projects they are responsible for. During the hours entry process, Projects would have to be assigned to hours codes for this report to function.
Payroll Budget to Actual - Allows the user to view a report that determines if the payroll will create an over-budget situation when the payroll is posted to the general ledger. The user can make necessary budgetary adjustments prior to posting the payroll, preventing any over-budget messages from displaying when the journal is later validated.
One Time Processing - Allows the user to view a report that lists any one-time processing deductions, benefits, or direct deposits completed during the payroll process.
Deductions Not Taken - Allows the user to view a report of any employees in the pay batch that did not have deductions taken from their check due to an insufficient balance.
Direct Deposits Not Taken - Same as Deductions Not Taken report in regards to employee’s Direct Deposits.
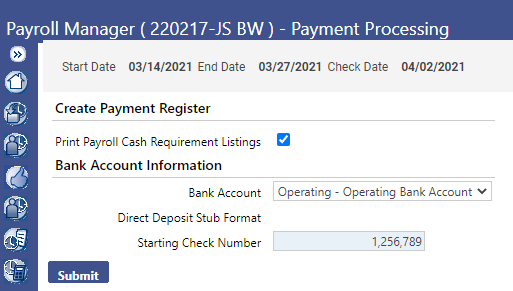
Payment Processing
The Payment Processing page lets you assign check/EFT numbers to employee paychecks and generate the payment registers associated with them. It is also from this area that the ACH and Positive Pay file will be created.
Note: Only one Payment Processing batch can be in progress per bank. If there are any other batches in progress, these will need to be posted prior to proceeding.
Bank Account - Select the Bank Account from which payroll checks will be issued. If a bank account was not specified in Company HR Settings, Not Specified will be displayed in the field. Otherwise, the account selected will be the default on this screen.
Starting Check Number – The first number the system will use when creating a check register. This number will be updated automatically as payments are posted in the system. Prior to clicking Submit, the user will want to verify that the check number listed matched the pre-printed check stock number (if applicable).
If all employees have been validated, click the Submit button to generate and send the Payment Register to myReports. If not all employees are valid, the system will not allow the user to proceed with processing.
Upon clicking Submit, the system will re-direct the user to the Payment Processing screen where the user can view payroll batch information, including the number of checks/EFTs to be printed and the Batch Total amount.
Register – A copy of the Payroll Register was sent to myReports upon clicking submit on the initial screen. However, if the user requires another copy of the register, it can be printed here.
Email Confirmations – Allows the user to send employees a confirmation that their payroll was completed and sent to the bank. The email can be customized to include the employee’s bank information, bank account number, and/or include a link to the eSuite page to review the payroll check. Only employees with an email address stored in their Workforce Administration file are eligible to receive this confirmation.
Positive Pay – Allows the user to create a file that is sent to the bank for verification on which checks are approved for the bank to process.
Choose the export file from the drop-down menu. Verify with your bank if you need to check the two options on this screen and click the OK button.
Navigate to myReports and click the Payments-Create Positive Pay File report in the list. Click Save in the dialog box and select the location where the user wants to save the Positive Pay file. Once this file is saved the user will complete the Positive Pay transmittal following pre-determined bank guidelines.
ACH – Allows the user to create an electronic file that will be sent to an automated clearing house.
To create the .txt to send to the bank, select the export type and enter the ACH Transaction Date. The ACH Name will default from the Company Suite Settings. This information should not need to be changed.
Select the Immediate Origin Type. This information is determined by the bank’s ACH criteria and the user should know which to use. Enter the appropriate Immediate Origin Number based on the option chosen above. The Originating Bank information will default from the bank selected when the payment batch is created.
Click the Create button at the bottom of the screen, and the ACH file will be sent to myReports where it can be saved from there.
Select the box next to Print ACH Transmittal Report for a report detailing the information included in the .txt file.
Navigate to myReports and click the Payments-Create ACH file report in the list. Click Save in the dialog box and select the location where the user wants to save the ACH file. Once this file is saved the user will complete the ACH transmittal following pre-determined bank guidelines.
Renumber – If checks need to be renumbered checks in the event there is an issue with the printing, the user can navigate here to renumber the checks and recreate a new Payment Register.
In the Start Renumbering at Check Number field, enter the number of the check at which the renumbering will start. Then, type the first Check Number of the renumbered checks. Six digits is the maximum length.
If an updated Payment Batch Register needs to be sent to myReports, select the Reprint Revised Check Register check box.
Click OK to renumber checks. If Reprint Revised Check Register is checked, a revised Payment Batch Register will be produced, showing the newly assigned check numbers.
Print – Area in which employee Checks and /or EFTs are printed.
In the Select to Print field, select whether to print checks, EFT stubs or both. Selecting Checks displays and enables the Print All Checks check box. If the user wants to print all checks in the pay batch, select the Print All Checks check box. This is automatically checked by default.
If the user only wants to print a range of checks, uncheck the box, and enter the range of check numbers in the From Check and To Check fields.
If you want to override the check format when printing payments, select the Override Check Format check box. This most often occurs when Accounts Payable and Payroll share the same bank and the AP check is the default on the bank. This override must be populated with the HR check name, or the checks will not print.
To add a message to be printed on the employees’ check, type in the desired note in the Standard message field. This message can be printed on the checks and/or the EFTs. Click OK to process payments.
Once payments have been processed successfully, the Payment Processing page will reopen, showing a Printer icon in the Printed column next to the Checks and EFT columns. Navigate to myReports to print the files.
Delete – Once a Payment Processing batch is initialized, no further changes are allowed to be employee timesheets. In the event a change is needed, the user will need to delete the processing batch to allow for employee modifications. The user will receive a warning prior to deleting the batch if Checks/EFTs have been printed and/or an ACH file has been created. Accept this warning to continue.
Post Payroll
The Post Payroll page lets you post a completed payroll and generate a journal entry to update to the General Ledger. This option is available only after you have printed the Checks, EFTs, and ACH file from the previous screen. The system will not allow the user to post payroll if those items have not been completed.
Fiscal Year - The Fiscal Year of the journal to be created. The next available journal number will be retrieved from the Next Journal Number field on the Counter tab of the Company Suite Settings page.
G/L Date – Date that will be assigned to all journal transactions created by the payroll posting process.
Click Submit to post the payroll batch and create a journal entry and the disbursement items to be paid through Accounts Payable. A pop-up will open to tell you when the payroll has completed. Click OK and the Payroll Manager Home page will reopen.
If you want to view the payroll you have posted, navigate to the Journal List page in Financial Management.
Post Payroll Processing
Disbursement Item List
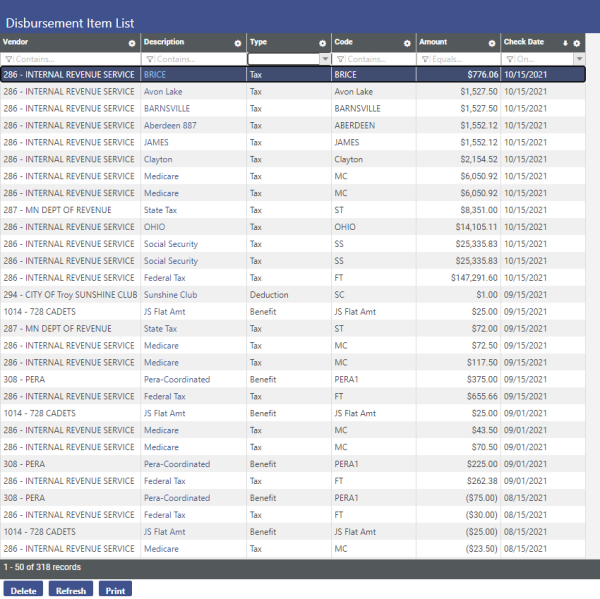
This is a listing of all the vendors that were included in the payroll batch for benefits, deductions, and taxes. Disbursements are listed here by check date until they are paid in Accounts Payable under Financial Management. Benefits that are selected with the box Do Not Create Disbursements under the Maintenance screen will not appear in this window. Once paid, the disbursements will disappear from this list automatically.
If the user does not want to pay a specific disbursement listed here, highlight the line, and click Delete. A confirm delete pop-up displays.
In the search criteria, the check dates that the user wants to see the disbursement listing for is required. To see only the disbursements for one check, enter the same date in both fields. Leaving the Vendor field blank will list all of the disbursements regardless of vendor. The user must select at least one type of disbursement. Navigate to myReports to view and print the files.
Deductions Not Taken
This listing shows all the deductions that were not able to be taken from employees’ checks on a per payroll basis. The items listed here are the same codes that appear on the Deduction Not Taken Register that can be printed in the Pay Day Reports. Employees that are not brought into payroll (and therefore did not receive pay) will not appear on this list.
Any deductions on this list will be brought into the payroll if the Create One-Time Deductions box is selected during the initialization of the payroll. If this box is not selected, these deductions can still be brought into the payroll individually through One-Time Processing. Once the deduction is paid, they will be removed automatically from the list. If only a portion of the deduction can be paid, the amount will be reduced on this list until it is paid in full.
If employees are making other arrangements to pay the amounts in this list, the user can delete the employee from the list by highlighting the appropriate line and clicking the Delete button at the bottom of the screen.
Direct Deposits Not Taken
This listing shows all the Direct Deposits that were not able to be taken from employees’ checks on a per payroll basis. The items listed here are the same codes that appear on the Direct Deposit Not Taken Register that can be printed in the Pay Day Reports. Employees that are not brought into payroll (and therefore did not receive pay) will not appear on this list.
Any direct deposits on this list will be brought into the payroll if the Create One-Time Direct Deposits box is selected during the initialization of the payroll. If this box is not selected, these direct deposits can still be brought into the payroll individually through One-Time Processing. Once the direct deposit is paid, they will be removed automatically from the list. If only a portion of the direct deposit can be paid, the amount will be reduced on this list until it is paid in full.